Leverage Rulestar's integration with Annature to embed electronic signatures directly into documents.
The electronic signatures feature requires you to enable the E-Signature feature on your Rulestar account as well as the Annature integration.
Overview
Typically, electronic signature software requires users to place signatures and other related fields into a PDF document before sending it to recipients for signing. Rulestar's e-signature feature allows you to create placeholders for those signatures in your template so that the document is ready to be sent for signing directly from the Submissions table.
You can add fields for signatures, names, initials, dates, checkboxes and a person's signing capacity using the same technique as merge fields. The fields are then connected to a signing party (a person or company) using the native contacts feature within Rulestar.
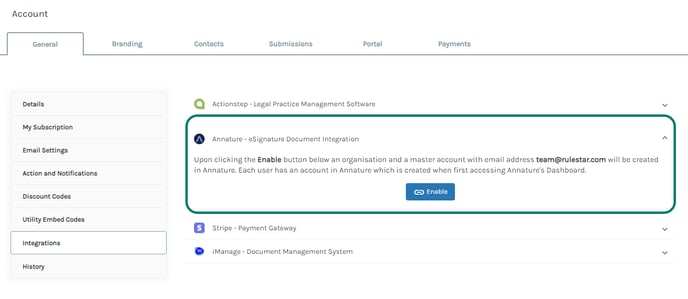
Enabling the Annature Integration
Navigate to the Account item under your organisation's name in the top-right corner of the application. Once on the Account page, open the 'General' tab and choose Integrations from the menu on the left. Next, expand the Annature item and click 'Enable'. This will create an Annature account linked to your Rulestar account. Anyone in your organisation will be able to use this feature once it is enabled.
Placing E-Signature Fields into Templates
E-signature fields are placed into templates in the same way as answers are merged in. That is, inserting a comment to some placeholder text to be replaced with the e-signature field upon document generation. When the document is generated, there will be two versions: the 'standard' version, which does not include the e-signature tags and a second version that includes the tags. This is so that the e-signature fields don't interfere with the traditional (or 'wet') signing process if you choose to use it instead of electronic signatures.
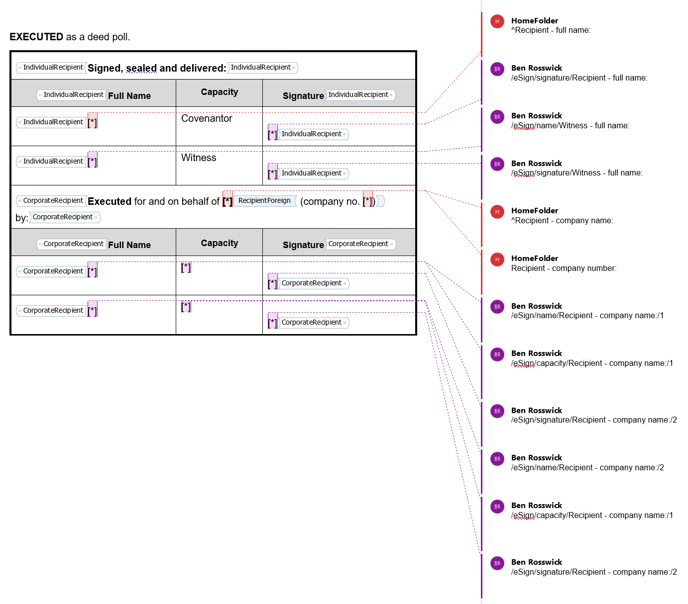
Comments in the templates must be added in the below format:
/eSign/[e-signature field]/[individual name field label]
or
/eSign/[e-signature field]/[company name field label]/[signer number]
Where [e-signature field] is one of "signature", "name", "initials", "date", "checkbox" or "capacity" and [individual name field label] and [company name field label] is the label of a field that is mapped using the Contacts feature to either an Individual's or Company's name in the form. [signer number] is either "1" or "2", noting that two signatories are usually required for corporate parties. See below for an example of how this could work for a signature block.
E-Signature Field Details
When creating the placeholders for merge fields, it's important to keep in mind the physical dimensions and behaviour of the fields once they're converted into electronic signature fields in Annature. All fields are anchored in the bottom-left corner of the placeholder. Note, where the dimensions are described as 'auto', they will adjust to the size of the contents. Where the contents are too large to fit, they will wrap by increasing the height of the container.
| Field Type | Comment Text | Placeholder dimensions (W * H) |
| Signature | /eSign/signature/[name field] | 138-40 |
| Initials | /eSign/initials/[name field] | 40*40 |
|
Name |
/eSign/name/[name field] | 98*auto |
| Date | /eSign/date/[name field] | auto*auto |
| Checkbox | /eSign/checkbox/[name field] | auto*auto |
| Capacity | /eSign/capacity/[name field] | auto*auto |
Sending a document for electronic signatures
To prepare a document to be sent for electronic signing, find the corresponding submission in the submissions table and click the  icon (see below):

Clicking on this icon will open the electronic signature history dialogue (see below). This is where all the details of the signing parties need to be entered (individual party details may be pre-filled if provided in the form, but corporate signatories will always have to be provided at this step).
The name and email address provided here is used to populate emails sent to the recipients requesting their signature.
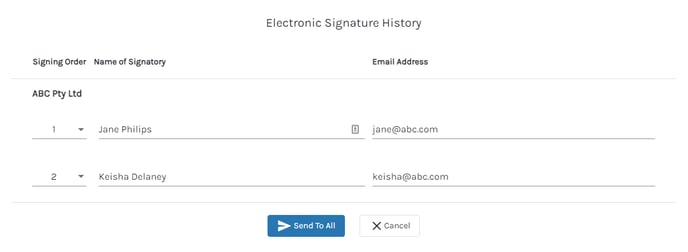
You can also specify the signing order of the parties. You can give more than one party the same number, in which case they will receive their email request to sign simultaneously. If a party is assigned a later order (i.e. a greater number), they won't receive the email request until all parties with an earlier order have completed their signing process.
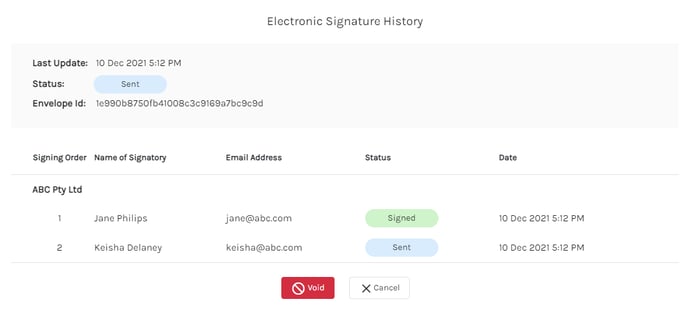
Once the process is initiated, you'll be able to keep track of who has signed and which parties remain outstanding. You'll also be able to void the document and both amend and resend a request if the delivery of an email fails.
When all parties have signed, the completed document will be emailed to all the parties and, along with the certificate logging each step of the process, will be available for download from this dialogue.