Creating, editing and deleting Users
Note: Only application administrators can manage users. Please contact your application administrator if you wish to add or edit a user other than yourself.
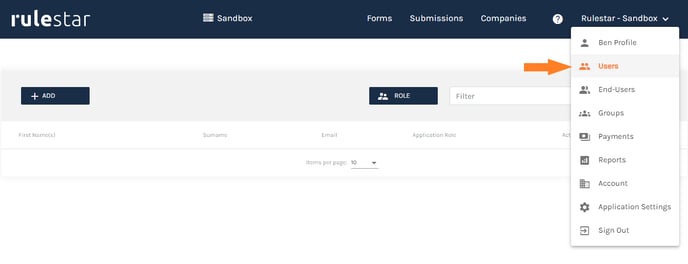
User management is done through the 'Users' menu item under the main menu (see screenshot below). This allows you to create and manage users one at a time.

Creating Users
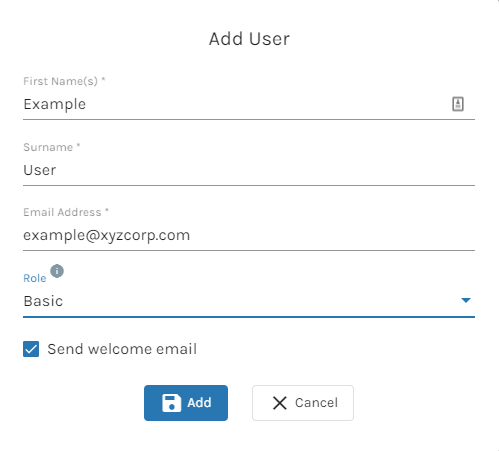
A user can be added by clicking the '+ Add' button in the top-left of the table which opens the dialogue below. After filling in the user's details, you need to choose an application-level role for them, either 'Basic' or 'Administrator'. You can read more about roles, here. You can also send an email asking the user to sign-up (creating a password) directly from the 'Add User' dialogue.

Editing Users
Clicking the  icon next to a user's record in the Users table will open a dialogue to edit a user's profile and manage their permissions. We will deal with permissions in the User Access Overview article so we'll discuss only the other possible actions on this page here.
On this page, you can edit a user's name (click the  icon next to their name) as well as resend the invitation to sign up, which can be done by hitting the 'resend welcome email' button (see below).

Deactivating (and Reactivating) Users
Users can be deactivated (and reactivated) from the main Users table using the  and
and  buttons respectively. These buttons can be found to the right of each user's record. Note that, once deactivated, users will no longer appear in the table unless you toggle the 'Show Deactivated Users' toggle in the top-right of the table.
